Pages

Showing posts with label recipes. Show all posts

Saturday, March 30, 2013

Roasted Green Beans

This recipe originally called for cauliflower but we made it with green beans instead and it was soooo good! Seriously, frozen green beans have never tasted so good! We will definitely be making these again.

Ingredients:
6 cups frozen green beans, thawed
3 cloves chopped garlic
1/4 cup olive oil
1/2 tsp. kosher salt
1/2 tsp. pepper
juice of 1/4 lemon
Parmesan cheese, grated 
Directions:
Thaw green beans in refrigerator the night before you plan to use. Preheat oven to 450°F. Combine garlic, olive oil, kosher salt, pepper, and lemon juice and toss so all green beans are well coated. Place in a
large shallow roasting pan and place in the center of the oven. Roast for about 30-35 minutes, turning green beans occasionally so they are evenly cooked. Remove from oven and top with Parmesan and additional salt and pepper if needed. Makes 6 servings @ 3 Points+ per serving.

Southwestern Slow Cooker Chicken

This recipe has not necessarily been one of our favorites, but it is very good and I think we will probably make it again. 

*Points+ Value: 5
servings: 8

Ingredients:
24 oz (1 1/2) lbs boneless skinless chicken breast
14.4 oz can diced tomatoes with mild green chilies
15 oz can black beans
8 oz frozen corn
1/4 cup chopped fresh cilantro (or parsley)
14.4 oz can fat free chicken broth
3 green onions, chopped
1 tsp garlic powder
1 tsp onion powder
1 tsp cumin
1 tsp cayenne pepper (to taste)
6 Tablespoons reduced fat sour cream
salt to taste

Directions:
In the slow cooker, combine chicken broth, beans, corn, tomatoes, cilantro (or parsley), green onions, garlic
powder, onion powder, cumin, cayenne pepper and salt in the crock pot. Season chicken breast with salt and lay the 1 1/2 pounds of chicken breast on top.
Cook on low for 8 hours or on high for 4-5 hours. 30 minutes before serving, remove chicken and shred chicken. Return shredded chicken to slow cooker and stir in. Adjust salt and seasoning to taste. Serve over rice. Top each serving with 1 Tablespoon reduced fat sour cream.

Recipe from shrinkingonabudget.com

Garlic Chicken Recipe

This has been one of our favorite recipes so far! This chicken is sooo good and its very easy/quick to make! We will definitely be making this chicken again.


*Points+ Value: 6
Servings: 4

Ingredients:
1.25 pounds boneless skinless chicken breast
4 garlic cloves, minced
4 tablespoons brown sugar
1 Tbsp. olive oil
1/2 teaspoon salt
1/2 teaspoon pepper
1 teaspoon Mrs. Dash Garlic and Herb seasoning.

Directions:
Preheat oven to 500. Cut chicken breasts into 5 ounce portions.
For Garlic Chicken: Take a large square of heavy duty foil and place in a 9 x 13 baking dish. Spray with non-stick cooking spray. In small sauté pan, sauté garlic with the oil until tender. Remove from heat and stir in brown sugar.
Place 4 of the chicken breasts on the foil square and cover with the garlic and brown sugar mixture. Fold up edges of foil to capture all the juices.

Bake uncovered for 20 minutes. Turn off oven and let rest in oven for 10 minutes

Recipe from shrinkingonabudget.com

Fruit Salad Recipe

This fruit salad recipe is inexpensive, quick and easy to make! Its perfect for a dessert that will be light, but still satisfying and sweet!


Ingredients:
1/4 Cup plain fat-free greek yogurt
2 Tbs. sugar-free raspberry preserves
4 cups sliced canned peaches, drained
3 cups no-sugar-added frozen blueberries, thawed
1/2 grapes (about 14)

Directions:
Combine greek yogurt and raspberry preserves in a small bowl. Combine peaches, blueberries, and grapes. Add yogurt mixture to bowl, and toss gently to coat.

Makes 4 servings @ 4 Points+ per serving

I chose to use fat-free Vanilla greek yogurt in place of plain yogurt simply because that was what I had on hand. I also used strawberry jam in place of the raspberry preserves for that same reason. This was very good and I'm sure we'll try it again. This would be good with other fruits too!

Recipe from shrinkingonabudget.com

Thursday, March 28, 2013

Spinach Feta Quiche

And now for another recipe post...
We tried this Spinach Feta Quiche recipe (from shrinkingonabudget.com) for dinner a few nights ago and it was great! I think it will definitely become one of our go-to meals. It is very inexpensive and easy to make (although its not necessarily a quick dinner because it has to bake for 45 minutes). We will be making this quiche again for sure!

*Points+ Value: 5
Servings: 6

Ingredients:
8 oz Mushrooms, sliced
1 1/2 tsp Garlic
10 oz Leaf Spinach (frozen)
4 Eggs
1 cup 1% Milk
2 oz Feta Cheese
1/4 cup Parmesan
1/2 cup Mozzarella

Directions:
Preheat your oven to 350 degrees. If your frozen spinach is not already thawed, thaw it in the microwave. Empty the box into a colander and let it drain while you begin to prepare the rest.
Place the sliced mushrooms in a skillet coated with non-stick spray, add the minced garlic, and sprinkle a little salt and pepper. Turn the heat on to medium-high and saute the mushrooms until they release all of their moisture and no more water remains on the bottom of the skillet (5-7 minutes).
Spray a pie dish with non-stick spray. Squeeze the rest of the water out of the spinach (very well) and spread it out on the bottom of the pie dish. Next add the cooked mushrooms and crumbled feta.
In a medium bowl whisk together the eggs until fairly smooth. Add the milk, parmesan, and another small sprinkle of pepper. Whisk to combine. (This step can be completed while the mushrooms are cooking) Pour this mixture into the pie dish over the spinach, mushrooms, and feta. Sprinkle the shredded mozzarella cheese over top. Place the pie dish on a baking sheet for easy transfer into the oven. Place the quiche into the preheated oven and bake for 45 minutes to an hour or until it is golden brown on top and the center is solid.

We paired this quiche with a quick and easy fruit salad and it was a perfectly filling, but light, dinner! I'll share the fruit salad recipe in the next post!

Chili Mac

Nate and I have recently decided to start following the Weight Watchers program at home in attempt to lose weight. We subscribed to weekly meal plans at skinnyonabudget.com so that it would be easier to find recipes that are healthy and WW-friendly. I'm going to be posting some of our favorite new recipes here mainly so that I can find them all in one place when we want to make them again.
Tonight we tried Lightened-Up Chili Mac from skinnyonabudget.com and it was VERY good! It is one of the dishes that is higher in points but let me tell you, it is worth every single one of those points! I really like that it doesn't require any expensive or hard-to-find ingredients and its also very easy to make. Its ready in less than 30 minutes! Without further ado, here's the recipe:

*Points+ Value: 9
servings: 6 (1 cup)

Ingredients:
1 teaspoon canola oil
3/4 pound ground sirloin
1 teaspoon garlic powder
1.5 teaspoons ground cumin
2.5 teaspoons chili powder
2 cups fat-free, lower-sodium beef broth
1/2 cup water
1 (10-ounce) can mild diced tomatoes and green chiles, undrained
(8 ounces) uncooked elbow macaroni
1/2 cup skim milk
(4 ounces) 1/3-less-fat cream cheese
(4 1/2 ounces) finely shredded 2% reduced-fat sharp cheddar cheese (Recommended Cracker Barrel)

Directions:
In a Dutch oven or very large large heavy bottomed skillet, add oil and heat over medium high heat. Add beef, garlic powder, cumin, and chili powder; cook 3 minutes. Add broth, water, and tomatoes; bring to a boil. Stir in macaroni; cover and cook 10 minutes or until macaroni is done.
2. Heat milk and cream cheese in a saucepan over medium heat. Cook 4 minutes or until cheese melts,
stirring very frequently. Remove from heat. Stir in cheddar. Add cheese sauce to macaroni mixture; toss well
to coat.

Well, that's all there is to it! I hope everyone enjoys this dish as much as we did!

Tuesday, January 24, 2012

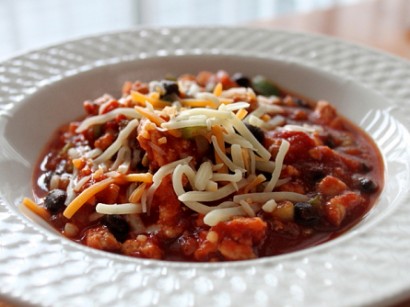
Healthy Turkey Chili

Yep, another recipe post. Here's whats on the menu for tonight:
Healthy Turkey Chili!
(Photo from rufflesandtruffles.com)
This chili is sooo good! It's not like traditional chili (at least, not the chili that I'm used to) because it has black beans instead of various red beans, and turkey instead of hamburger, which makes it a lot healthier. It also only takes about 30 minutes to make instead of having to simmer for hours. Nate and I both really enjoy it. The turkey is very tasty and filling. Its perfect with a dollop of sour cream and some shredded cheese on top! Here is the recipe on the original blogger's site and here is the site with the printable recipe. Enjoy!

Monday, January 23, 2012

Southwestern Stuffed Mushrooms

Tonight we made Southwestern Stuffed Mushrooms for dinner. This is one of our most favorite meals. It is quick, easy, extremely tasty, and also pretty healthy! If you leave out the sour cream, it would be low-carb, too. I highly suggest trying these mushrooms! Also, we like to make a double batch of the filling and then freeze the leftovers so that the next time we want to make them, we just have to defrost the filling, stuff the mushrooms, and warm them in the oven. Trust me, you want these for dinner tomorrow night! You can the recipe here and a printable version of the recipe here.

                                                             (Photo from tastykitchen.com)

Monday, August 8, 2011

Grilled Eggplant Pizza

Woo hoo! My first recipe post!
This recipe was inspired Miss Wisabus's Zucchini Mini Pizzas.
There are no pictures, but they really are not necessary because this is so simple.
You will need:
One eggplant
Pizza Sauce
Shredded Cheese
Pizza Toppings of your choice

First, slice your eggplant. I sliced mine to an average thickness, about the same as you would slice a tomato for big burgers. 
Next, grill one side of each eggplant slice. I used a panini press to do this, but a griddle or George Foreman grill would work just as well. This could possibly be done right in a pan, but removing the pizzas after they are topped might be difficult. 
Once the top side of the pizza is warm to the touch and you have nice grill marks on the bottom of each eggplant slice, flip each slice. 
Now you can start topping your pizzas. Put the pizza sauce, cheese and toppings on each slice. I usually take them off the grill once the cheese has melted because then I know that they have heated all the way through.

This is such a cheap, easy, and healthy meal! It tastes a lot like Eggplant Parmigiana, but because its not breaded, its healthier. It can also be low-carb, if you use a low-carb pizza sauce and low-carb toppings.  
For real, this doesn't take more than ten minutes to make and its sooo good! Nate liked it, too, and he liked that it was a healthy, yet tasty, dinner.